I've been super interested in screenprinting for a while. I always brushed it off because after taking a class, I realized it involved too much machinery for me to deal with. Here and there I experimented with easy methods of printing at home. Stencils -> been there, done that, over it. Then I found a simple way that involved an embroidery hoop, pantyhose, and Mod Podge. LIFE CHANGING.
But hold your horses. This isn't too glamorous of a post. Here's a lesson of something my professor called 'trial and learning'. Keep reading.

I for some reason found it hard to find decent tutorials when I first tried it. So I experimented on my own and gathered materials that sounded good.
First I made a little design and printed it out. Then found an embroidery hoop that fit the design perfectly, old pantyhose, Mod Podge, and screenprinting tape in which I still had leftover from my class. And of course pencils, a brush, and a scissor.

I put the pantyhose in the embroidery hoop and really secured and fastened it. Then I cut pieces of the tape and placed it around to make sure the screen stays in place.
I found I didn't like tracing the image onto the pantyhose because the material was too stretchy to make that work. So I elevated the embroidery hoop with the image lying underneath and kinda just eyed where to paint the glue. It was effective and I was able to successfully copy the image with the glue.
After it all dried, I found fabric to experiment on, and this is how it came out.
Ptthhh. Didn't work.

I researched more, and came to the conclusion that the pantyhose wasn't effective. It's too stretchy.
Screenprinting is also known as silkscreening - silk can be used for screens; it's a strong, woven material with big enough tiny holes to let paint print through. I rummaged through my house looking for fabric with those qualities and found some synthetic voile. Another alternative is sheer woven curtains in which you can easily find at a thrift store.

I went for round two bringing in less materials. I drew lips as an easy second experimentation attempt. Same as the first time around, I secured and fastened the new material, place the screen on top of the sketch and copied the image using the glue and brush.

This material is a little more tricky. Took a lot of attempts to cover the large areas. The glue gets pushed around more than being absorbed as it did with the pantyhose, so it's best to let the glue dry every so often before adding more + more layers.

I didn't want to use that tape again because it was pretty annoying, but I wanted to add something to make sure the screen doesnt slip out of the hoop. I used Gorilla Glue to do just that (that's what the white bubbly crap is in my screen. It dries pretty funky but it does the job.)
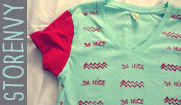
After all the glue dried, the screen just felt durable. I went ahead and placed it on my shirt and just painted with a sponge brush.

Annnnd the final conclusion: It totally worked. Hurray!
Tips:
• If you're working with an image with type or anything of the sort, depending on how you decide to work with the screen, make sure the image is mirrored so it will be painted the correct way onto your shirt.
• When inserting the fabric in the hoop, make sure you bring in the fabric tight but not tight enough to rip the fabric (I accidentally did that, oops).
And there you go.