Crafted // Day Of The Dead Wristbands

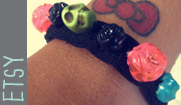
I have surely been going crazy making wristbands. It all started when I made this one...

I had a few skull beads lying around that I had originally planned on using to make an actual beaded bracelet with roses and whatnot for a Day Of The Dead theme. I didn't have any elastic string and I didn't know what else to do, so I found a black fabric band laying in my room. I sewed the beads on, then sewed snap clips at the ends, and voila. I finally made my DOTD bracelet in a different form.

I actually liked how it came out, so I made one for a friend...

...And I made a crapload more which will soon be upload onto my Etsy shop. I currently have one listed, but I've made much more that I plan on posting up soon.

I've been inspired to make wristbands using beads and fabric, and of course I have plans to make much more. If you like any you see, feel free to visit my Esty shop! It will soon be overloaded with wristbands because I've been on a roll with whipping these things out.
I don't know where all of this creative energy came from, but I like it!

Crafted // Beaded Wristband

So, is it me or do you find yourself having the time of your life in Michaels as well?
I went browsing the other day and walked out with the best finds; the clearance section was UH-MAZING. Screenprinting paint, linoleum block ink, glass frosting paint, and beads! I found these beads and fell in love.

After buying these beads, I knew I wanted a bracelet but didn't have any idea on how I wanted it to look like. I let the idea stew; I thought of a wristband. Found supplies and materials, and began.
Here was my process through images.

It came out better than I thought!
Diy // Deodorant

I decided to jump on board the homemade deodorant train. It was really a last minute decision in which my friend convinced me to try out. We bought ingredients and whipped it up in a few minutes. Super easy to make.

The ingredients are as followed:
1/3 cup of coconut oil
1/4 cup of baking soda
1/4 arrow root powder
4 tablespoons of corn starch

Notes:
The mixture will seem very powdery, but if you mush the mix instead of stirring, it will come out the consistency that it should be.
If your coconut oil is cold and hard, you can microwave it for a few seconds until it's soft enough to mush with the mixture.
You can add a scented oil if you'd like. Definitely make sure it's safe for skin. I made the mistake of buying a lavender scent that is made for only candle making.
If you do decide to mix a scent, also make sure it will mix nicely with the coconut scent. A safe scent mixture will always be vanilla and coconut. I mixed plumeria and I'll admit, smells a little weird. Kinda smells like weird Autumn.

A good consistency will be like a creamy dough-like feel. If it's not creamy enough, add more coconut oil. If it's too creamy, add more baking soda.
When the mixture is all done and good, scoop it into any kind of container. I found a 5 ounce clear plastic jar fit the deodorant perfectly.

To apply the deodorant, you can just scoop a little dab with your finger and smear it on yourself. Don't rub it in; it will exfoliate which you don't really want. Don't apply it thickly. A nice thin layer will be just fine. From personal experience, I haven't witnessed any white deodorant marks on my shirt, and the deodorant lasted the entire day. All good things! If you don't shower at the end of the day, make sure to clean yourself with a wet washcloth otherwise you will wake up to a bit of deodorant buildup.

Now that I shared everything I possibly can, I encourage you to go make some. It's a nice natural alternative.
My next step is to make a fun label for my deodorant jar. I'm excited to go label designing crazy!

DIY // Quick Button Fixup

I bought this pair of pants a few weeks ago. They fit perfect and I was happy.

Then a couple of days ago, the button/rivet popped off!

I tried putting it back together using pliers, but it didn't stay. I was stumped. Then I thought DUH, I can sew another button on. I went through my dandy button collection. I decided to pick a fancy button in which I never find a good opportunity to use.

I found this cute anchor button and sewed it on.

And voila! My pants are fixed. It's a good idea if you want to spice up a pair of pants! Pop off the button and sew a fun one on.

Tuesday Roundup

Life has been busy. Here's a little roundup of things I wanted to share that have been occupying my time. I'm hoping to make somewhat of a dent in my list of "things to accomplish this summer" when some free time comes around!

The last two summers I worked with a summer program for kids with special needs in our district. This summer I was given the opportunity to come back. Every Friday we take the kids on a field trip. Two Fridays ago we went to Atlantis Marine World out east on Long Island. I enjoyed looking at the koi fish.

Last week, we took the students to Long Island's amusement park Adventureland. (Yes, the movie was based after this park.)

The last two Wishlist Wednesday posts, I listed items that I acquired; I splurged just a bit and purchased screenprinting paint, linoleum boards, a brayer, and the Kids In The Hall complete series. I plan on keeping myself very occupied the rest of the summer.

I also work part time at a beauty supply shop. This month we were given a few free promotional items. One was this Beyond The Zone dry shampoo. I have to say, it works well! I'm not a big fan of the Beyond The Zone semi permanent hair dye, but their other hair products work pretty darn good.

One last thing. I wanted to share this hilarious video from Buzzfeed on How To Be A Mysterious Girl. I hope you get a kick out of it as much as I did.

Flashback Friday // 014

I'm a little disappointed with myself for not posting more this month. I've been working two jobs this summer, so all free time has been eaten away. With the little time I have for myself, I haven't been able to finish projects. And with no finished projects, I don't have much to blog about. I've been making good progress though, don't worry.

I've been wanting to post this flashback post for a while now but never got around to it.
Last summer we did some touch up painting around the house. One area we focused on was the staircase. We painted it a light tan, and my mom wanted a cherry blossom design going down the stairs. She was inspired by this cabinet of mine I painted.
I drew out the "pattern" and painted it with black wall paint.

I cut out some stencils for birds. All black paint carried all the way down stairs. For finishing touches I used gold paint to add some extra funkiness to the blossoms, branches, and birds.

At the bottom of the stairs, my dad built this shoe shelf years ago. I was told to paint the door as well with all cherry blossoms and birds. So once again, I continued to free hand the branches and cherry blossoms while using the stencil for the birds.

To this day, we haven't gotten around to it yet, but we plan on framing this print and hanging it up on the wall. We bought this print from our visit to Portland last summer. I loved it, wanted it, bought it, and plan on framing and hanging it.

Hopefully we'll get around to hanging up that print soon! #Goal

Crafted // Grad Gift Extravaganza

My wonderful friend Katie threw a graduation party last night. She graduated college last year but saved the party for the summer for when she knew she'd be in town. My friends and I scrambled last minute to give her a batch of wonderful gifts, preferably gifts we made with love.

We browsed Pinterest for inspiration and made a few things we saw and loved, and added our own twist. We had the craft party at my house!

My friend Jess found this old painting with knobs at Goodwill, in which we painted black with chalkboard paint; chalkboard paint is seriously the coolest thing ever.

We printed out photos of music sheet and maps of Long Island and decoupaged them onto tiles. Coasters!

We all had separate jobs and different projects to work on. I worked on this New York/Louisiana state painting in which I glued the states onto thin canvas.

I love me some mixed media, so I glued beaded string around the oval.

End result: Katie cried happy tears.
I have the best friends ever.